Nodejs学习
全局对象
全局对象就是不需要引入任何第三方文件,可以直接以node执行的,比如console.log() 就属于一个全局对象。
处理GET请求
const http = require('http');
const server = http.createServer((req,res) => {
  res.end('Hello World');
});
server.listen(5000, () => {
  console.log('Server is running on port 3000');
});
先引入http,创建一个http服务器,通过res.end 来输出内容,然后用server.listen 监听5000端口。这时候打开浏览器就会发现输出了Hello,world,这样就成功处理了一个GET请求。
那么如何获取查询字符串呢?我们需要引入querystring,然后
req.query = querystring.parse(url.split('?')[1]);这样来获取查询字符串的内容并转换为对象
const http = require('http');
const querystring = require('querystring');
const server = http.createServer((req,res) => {
const url = req.url;
req.query = querystring.parse(url.split('?')[1]);
    res.end(JSON.stringify(req.query));
  res.end('Hello World');
});
server.listen(5000, () => {
  console.log('Server is running on port 3000');
});
处理POST请求
const http = require('http');
const querystring = require('querystring');
const server = http.createServer((req,res) => {
if(req.method ==='POST') {
    let postData = '';
    req.on("data",chunk => {
        postData += chunk.toString();
    });
    req.on("end", () => {
      console.log("postData:", postData);
      res.end("Received POST data");
    }
}
});
server.listen(5000, () => {
  console.log('Server is running on port 3000');
});
req.on('data', chunk => {
  // 每收到一块数据就会执行这里
});

req.on('end', () => {
  // 数据全部接收完毕后执行这里
});这里使用chunk来接受了POST过来的二进制数据,然后用toString 转换为了字符串
res.setHeader("Content-Type", "application/json");这个可以规定输出的请求头的格式
搭建开发环境
nmp init -y这条命令可以生成一个package.json 用来配置npm
我们要创建一个bin 文件夹,在里面创建一个www.js 作为最开始执行的一个文件,可以在这里面写上监听端口,创建服务器等代码,在www.js 中填入以下文件:
const http = require('http');

const PORT = 5000;

const serverHandler = require('../app');

// 需要将 serverHandler 传入 createServer
const server = http.createServer(serverHandler);

server.listen(PORT, () => {
  console.log(`Server is running on port ${PORT}`);
});然后我们在根目录下面创建一个app.js 用于负责配置和组织应用功能(路由、中间件等),并写入以下内容:
const serverHandler = () => {}

module.exports = serverHandler;然后我么把serverHandler 引入到www.js ,把下面这行代码写进入:
const serverHandler = require('./app');然后我们就可以回到app.js 中的serverHandle 写服务器的业务代码了
之后再去package.json 里面把入口由index.js 改成bin/www.js
我们可以安装一个工具nodemon,作用:
监控你的项目文件变化(如
.js文件)文件有变动时,自动重启 Node.js 服务
让你开发时不用手动重启服务器,提升效率
安装命令:
npm install nodemon -D{
"name": "code",
"version": "1.0.0",
"description": "",
"main": "bin/www.js",
"scripts": {
"test": "echo \"Error: no test specified\" && exit 1",
"dev": "nodemon bin/www.js"
},
"keywords": [],
"author": "",
"license": "ISC",
"type": "commonjs",
"devDependencies": {
"nodemon": "^3.1.10"
}
}
然后我们更改一下package.json 加上dev,这样可以保证每次代码变动时重新执行最新的服务端代码,然后再执行npm run dev 来让nodemon来监听www.js
初始化路由
我们要先在根目录下创建一个src 目录,然后在这个目录下面创建一个routes作为我们的路由文件夹。比如我们可以在routes文件夹下新建一个blog.js 来处理博客相关的路由
blog.js:
const handleBlogRoute = (req, res) => {
    const method = req.method;
    const url = req.url;
    const path = url.split('?')[0];

    if (method === 'GET' && path === '/api/blog/list') {
        return {
            message: '获取博客列表的接口',
        }
    }

    if (method === 'GET' && path === '/api/blog/detail') {
        return {
            message: '获取博客详情的接口',
        }
    }

    if (method === 'POST' && path === '/api/blog/new') {
        return {
            message: '新建博客列表的接口',
        }
    }

    if (method === 'POST' && path === '/api/blog/update') {
        return {
            message: '更新博客列表的接口',
        }
    }

    if (method === 'POST' && path === '/api/blog/delete') {
        return {
            message: '删除博客列表的接口',
        }
    }
}

module.exports = handleBlogRoute;
app.js:
const handleBlogRoute = require('./src/routes/blog');

const serverHandler = (req, res) => {
    res.setHeader("Content-Type", "application/json");

    const blogData = handleBlogRoute(req, res);
    if (blogData) {
        res.end(JSON.stringify(blogData));
        return;
    };

}

module.exports = serverHandler;
这样就已经定义了一个接口。
如果我们访问了一个不存在的接口,应该返回40,这时候我们就要回到app.js 进行配置:
//app.js
const handleBlogRoute = require('./src/routes/blog');

const serverHandler = (req, res) => {
    res.setHeader("Content-Type", "application/json");

    const blogData = handleBlogRoute(req, res);
    if (blogData) {
        res.end(JSON.stringify(blogData));
        return;
    };

    res.writeHead(404, { "Content-Type": "text/plain" });
    res.write("404 Not Found\n");
    res.end(); //完成响应,告诉客户端数据传输完毕
}

module.exports = serverHandler;
const url = req.url;
const path = url.split('?')[0];这段两行代码可以进行优化,放到app,js 中:
    const url = req.url;
    req.path = url.split('?')[0];
创建第一个路由
现在根目录下创建model 文件夹,在下面创建responseModel.js ,在里面写入:
class BaseModel {
    constructor(data, message) {
        if(typeof data === 'string') {
            this.message = data;
            data = null;
            message = null;
        }

        if(data) {
            this.data = data;
        }
        if(message) {
            this.message = message;
        }
    }
}

class SuccessModel extends BaseModel {
    constructor(data, message) {
        super(data, message);
        this.errno = 0;
    }
}

class ErrorModel extends BaseModel {
    constructor(data, message) {
        super(data, message);
        this.errno = -1;
    }
}

module.exports = {
    BaseModel,
    SuccessModel,
    ErrorModel
};然后在blog.js 引入这个类:
const { SuccessModel } = require('../../model/responseModel');

const handleBlogRoute = (req, res) => {
    const method = req.method;

    if (method === 'GET' && req.path === '/api/blog/list') {
        const author = req.query.author || '';
        const keyword = req.query.keyword || '';
        const listData = getList(author, keyword); // 假设 getList 是一个函数,用于获取博客列表
        return new SuccessModel(listData, '获取博客列表成功');

        // return {
        //     message: '获取博客列表的接口',
        // }
    }

    if (method === 'GET' && req.path === '/api/blog/detail') {
        return {
            message: '获取博客详情的接口',
        }
    }

    if (method === 'POST' && req.path === '/api/blog/new') {
        return {
            message: '新建博客列表的接口',
        }
    }

    if (method === 'POST' && req.path === '/api/blog/update') {
        return {
            message: '更新博客列表的接口',
        }
    }

    if (method === 'POST' && req.path === '/api/blog/delete') {
        return {
            message: '删除博客列表的接口',
        }
    }
}

module.exports = handleBlogRoute;const { SuccessModel } = require('../../model/responseModel');

const handleBlogRoute = (req, res) => {
    const method = req.method;

    if (method === 'GET' && req.path === '/api/blog/list') {
        const author = req.query.author || '';
        const keyword = req.query.keyword || '';
        const listData = getList(author, keyword); // 假设 getList 是一个函数,用于获取博客列表
        return new SuccessModel(listData, '获取博客列表成功');

        // return {
        //     message: '获取博客列表的接口',
        // }
    }

    if (method === 'GET' && req.path === '/api/blog/detail') {
        return {
            message: '获取博客详情的接口',
        }
    }

    if (method === 'POST' && req.path === '/api/blog/new') {
        return {
            message: '新建博客列表的接口',
        }
    }

    if (method === 'POST' && req.path === '/api/blog/update') {
        return {
            message: '更新博客列表的接口',
        }
    }

    if (method === 'POST' && req.path === '/api/blog/delete') {
        return {
            message: '删除博客列表的接口',
        }
    }
}

module.exports = handleBlogRoute;这里面getList这个函数需要去控制器里面定义。我们在scr 下新建一个controlers 文件夹,然后在下面创建同名的blog.js 在里面定义函数,然后再回到原来的js通过
const getList = require('./controlers/blog')
;
引入。
super是用来继承父类的
处理异步代码
定义函数用async ,调用用await
处理POST数据
app.js:
const querystring = require('querystring');
const handleBlogRoute = require('./src/routes/blog');

const getPostData = (req) => {
    return new Promise((resolve, reject) => {
        if (req.method !== 'POST') {
            resolve({});
            return;
        }

        if (req.headers['content-type'] !== 'application/json') {
            resolve({});
            return;
        }

        let postData = '';
        req.on('data', chunk => {
            postData += chunk.toString();
        });

        req.on('end', () => {
            try {
                const data = postData ? JSON.parse(postData) : {};
                resolve(data);
            } catch (error) {
                reject(error);
            }
        });

        req.on('error', reject);
    });
}

const serverHandler = async (req, res) => {
    try {
        res.setHeader("Content-Type", "application/json");
        const url = req.url;
        req.path = url.split('?')[0];
        req.query = querystring.parse(url.split('?')[1]);

        // 正确获取POST数据
        req.body = await getPostData(req);

        const blogData = handleBlogRoute(req, res);
        if (blogData) {
            res.end(JSON.stringify(blogData));
            return;
        }

        // 只有在没有其他路由处理时才返回404
        res.writeHead(404, { "Content-Type": "text/plain" });
        res.write("404 Not Found\n");
        res.end();
    } catch (error) {
        console.error('服务器错误:', error);
        res.writeHead(500, { "Content-Type": "text/plain" });
        res.end('Internal Server Error');
    }
}

module.exports = serverHandler;
MySQL
要对数据库执行操作,需要先用SQL语句来选择数据库:use myblog
show tables 可以查看当前的表
增:
insert into blogs (title,content,author,createdAt) values('标题1','内容1','zhangsan','123456789')查:
select * from blogs这样是获取blogs表中所有的数据
select id, author from blogs这样是获取blogs表中id列与author列
select * from blogs where title='标题1';这个可以搜过标题有“标题1”的行
select * from blogs where title='标题1' and author='zhangsan';都包含
select * from blogs where title='标题1' or author='zhangsan';包含其中一个搜索
select * from blogs where title like '%1%';使用like 可以模糊查询
select * from blogs where title like '%1%' order by id;使用order by 可以根据某个东西进行排序,在整个语句末尾加上desc 可以倒序
改
update blogs set title='标题3'这个可以把数据表中所有的标题都改为'标题3
update blogs set title='标题3' where content='内容1';'可以用where 关键字来限定条件,这里就是规定只改内容为'内容1'的标题,但是这样更新不会成功,我们还需要执行一下关闭MySQL安全更新的语句:SET SQL_SAFE_UPDATES = 0;
删
delete from blogs这样会删除整个表
delete from blogs where title='标题2';我们可以给他加上限定条件
但是使用delete 关键字还是过于危险了,所以我们可以用到软删除。
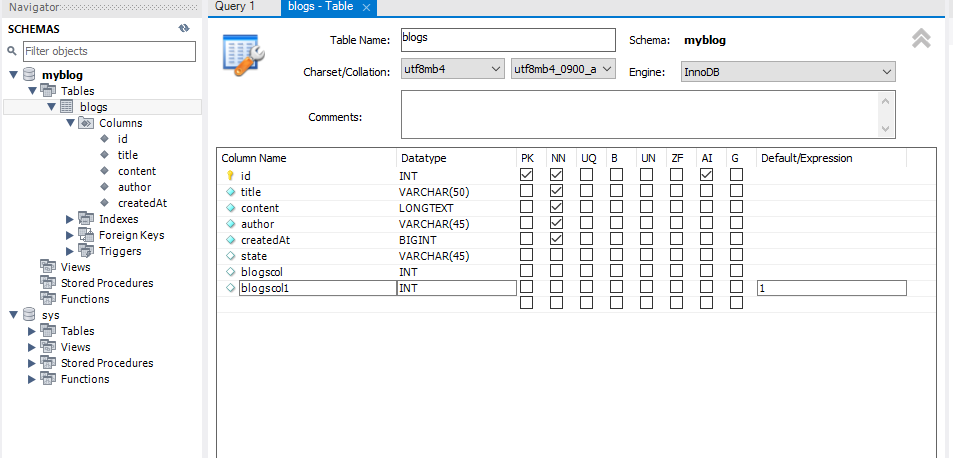
我们给Default/Expression的值改为1
update blogs set state='0' where author='zhangsan';改变它的值为0,就相当于"删除了"
select * from blogs where state='1';这样再使用where state='1' 来查询就查不到它了
update blogs set state='1' where author='zhangsan';再把值改回1就可以恢复啦
select * from blogs where state<>0;在SQL中,<> 就是不等于的意思
Nodejs 连接 MySQL
首先我们需要通过npm install mysql2来安装mysql插件
const mysql = require('mysql2'); // 改为 mysql2

const connection = mysql.createConnection({
    host: 'localhost',
    user: 'root',
    password: '@Aa2257436167',
    port: 3306, // 改为数字
    database: 'myblog'
});

connection.connect((err) => {
    if (err) {
        console.error('数据库连接失败:', err);
        return;
    }
    console.log('数据库连接成功');

    const sql = 'SELECT * FROM blogs';
    connection.query(sql, (err, result) => {
        if (err) {
            console.error('Error executing query:', err);
            return;
        }
        console.log('Query result:', result);
        connection.end();
    });
});
我们要把语句先放进一个变量里面,然后再通过方法调用
封装MySQL函数
我们可以创建一个/src/db/mysql.js ,在里面放入相关代码:
const mysql = require('mysql2'); // 改为 mysql2
const MYSQL_CONFIG = require('../config/db');

const connection = mysql.createConnection(MYSQL_CONFIG);

connection.connect()

function execSQL(sql, callback) {
    connection.query(sql, callback);
}

function execSQL(sql) {
    const promise = new Promise((resolve, reject) => {
        connection.query(sql, (err, result) => {
            if (err) {
                reject(err);
                return;
            }
            resolve(result);
        });
    });
    return promise;
}

module.exports = {
    execSQL
};
然后再其他文件引入:
const { execSQL } = require('../../src/db/mysql');调用:
const sql = 'SELECT * FROM blogs';
const result = await execSQL(sql); // 使用 await当然我们也可以创建一个/src/config/db.js 来单独存放文件:
let MYSQL_CONFIG = {}
MYSQL_CONFIG = {
    host: 'localhost',
    user: 'root',
    password: '@Aa2257436167',
    port: 3306, // 改为数字
    database: 'myblog'
}

module.exports = MYSQL_CONFIG;我们再在mysql.js 中去引入它:
const MYSQL_CONFIG } = require('../config/db');

const connection = mysql.createConnection(MYSQL_CONFIG);